Tuesday, June 30, 2009

Misty Garden

Another finished object! Hurrah! I'm knockin' 'em out like crazy lately!

This one, however, is a gift, and I don't want to give it away... although I think the person I made this for doesn't look here. But you'll have to come back in January to see the whole thing! Here's a bit of a tease:


Tells you next to nothing, eh? :)

On to my next UFO... debating between my Ritzy Mitts, which would be a quick finish, or my Bohemian Shawl, which will take quite a bit longer.

Stay tuned!

Sunday, June 21, 2009

Short Row Brights


I love it when a pattern and a yarn come together in the perfect combination. I think this is one of those times.

Short Row Ribs Scarf

Pattern: Short Row Rib*
also see others on Ravelry and my Ravelry post
Yarn: Noro Kureyon
Color: 166
Amount: 3 skeins, about 330 yards, a few yards leftover.
Needles: US 8 (5 mm)
Size: 7" x 72"

I know a lot of people have complaints against Noro yarns, and to some extent I understand: it's not always the softest yarn in the world (but soaking and blocking does wonders!), sometimes it comes with knots and "twigs," (although I personally haven't seen much of this), and some of the color changes can result in a muddy stretch of yarn.

But I still love Noro, love their colors, and I love the yarn and the effects I get with it.

Here's a perfect example.


I loved the brights in this yarn but wasn't sure what would be the best way to use them and not have them get lost. Then I stumbled on this pattern -- and I couldn't be happier with the combination.

It's a relatively quick and easy knit. It says it's for "intermediate" knitters but I think if you're brave and have done some simple work, you won't find this hard at all. You have to pay attention in a few places and then it takes off.

The pattern I used is basically the same as the one I linked to but the link isn't the original (which has apparently been removed from the internet) -- so there may be slight differences. Let me know if you run into any problems or questions. I've already walked a few people through this pattern.


A blurry but good depiction of the short rows.


The pattern uses a technique called (in case you haven't figured it out) "short rows." On initial reading, the directions may not necessarily make sense, but if you just plunge in and go, it works. And look at the wonderful color banding you get!

The technique is the same as I used in a scarf I made for a friend although the pattern is a little different. Both were fun knits.


Happy knitting!


Saturday, June 13, 2009

Noro Mitts


Noro Mitts

Pattern: Bainbridge mitts
(also see her post on Ravelry -- again, if you're a member)
Yarn: Noro Silk Garden
Color: 243
Amount: scraps, not sure of yardage I used;
pattern calls for 150 yds. of DK weight
Needles: US 3 (3.25 mm)
Size: women's small


After making Mary Alice's Bainbridge mitts, I had to make myself a pair. Definitely my favorite of all the fingerless patterns I've made so far.

I wanted them to go with my Noro striped scarf so I dug up scraps of yarn left over from that project. It was close, but I made it -- just! I had to use short pieces to finish the final rows and bind off.

Details about the construction of the original pattern are on the pattern post. The only variations I made were to CO 34 instead of 36, and to do the Noro stripe thing made popular by Jared Flood. Oh, and I might have added a few extra rows to make them longer; I don't have my notes any more so I'm not sure.

Although I thought I was careful and made notes, one mitt ended up shorter in length than the other -- the first (mostly greys) turned out perfect, but the other is shorter. I did the best I could to recount rows and look over all details carefully and my conclusion is that the problem was with the yarn. Noro can vary some in thickness, and as I thought back to my knitting and examined the mitts, I realized that the second mitt was knit mostly with Noro that was thinner, and the first mitt was knit mostly with Noro that was thicker.

I seem to be the only one who realizes the mitts aren't quite the same length. And if I had enough yarn, I would frog the bind-off of the second mitt and add a few rows. The extra rows would be less noticable (to me, anyway) than the shorter length.


But I love these mitts. And accepting imperfections is one of the major parts of love, no?

Back to finishing up UFO's!

Sunday, June 7, 2009

Back in the Saddle

The knitting saddle, that is.

I've taken a huge block of time off knitting since late spring -- seems to hit every year about that time -- not that I lose interest in knitting, so much as there are other things pulling at me.

Now I'm back to knitting during those dusky quiet evening hours, listening to the birds, and enjoying the cool north breezes.

I have five projects that I've left hanging for several weeks. My first plan is to finish them up, one by one. I'm only allowing myself to start one new project until I get at least three done. For someone who has chronic startitis, that's a restriction!

That doesn't mean I can't dream of other projects, of course. I'm already thinking of holiday and other presents. Great fun, always, to dream and do a little creative thinking. I've also got my stash so highly organized it's scary (thanks, Ravelry! Love all the stash options you give us!) and am ready to do some stash busting once I get done with my current projects.

And I can also catch up on posting a few projects that have been completed.

Here's one of my favorites.


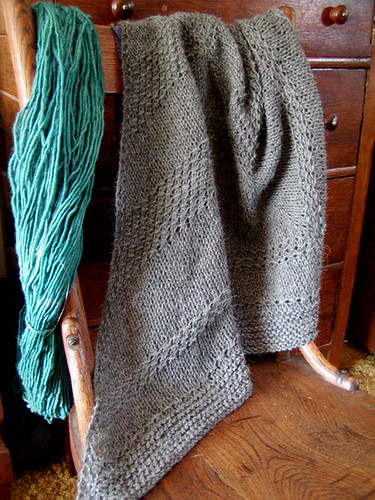
Textured Surino Shawl

pattern: Textured Shawl by Orlane
yarn: Plymouth Yarn Suri Merino
color: 402, gray
amount: 4 skeins, every inch
needles: US 9 (5.5 mm)
finished measurements: 28" from mid-neckline to tip;
62" along longest (neckline) side.


This is an easy, elegant shawl. I found it on Ravelry, and if you aren't a member you can't see the original and her directions, for which I apologize. But if you're not a member, please consider joining. It's free and incredible. You can read my past shameless plugging for Ravelry... can't help it, just love what they've done for needle crafters all over the world.

Orlane didn't have a pattern but did post the general directions for her shawl. It's basically three stitch patterns: stockinette, garter, and a textured stitch pattern. You repeat rows of each for however long looks good to you and for as long as you have yarn.

Please do look at Orlane's version if you have access to Ravelry. It's far more beautiful than mine, and so are many of the others done by Ravelry members.

My shawl is soft and warm and I'm really happy with the yarn. It blocked out well, doesn't seem to shed, and is very cozy.

Overall, I highly recommend this pattern. It was a fast and fun knit; there was absolutely nothing demanding about it, and it's a good first shawl if you haven't made one before. And the results are spectacular.

You can vary the yarn weight but will have to be better than I am about estimating the amount you'll need if you do so. I've seen in made in fingerling weight yarn and it's lovely. I personally would not recommend a variegated or other multi-colored yarn (heathered yarns being perhaps an exception) because the beauty and simple elegance of the various textures of the stitches get lost in multiple colors. And the simplicity and texture is a huge part of what makes this shawl so incredible.

I wish I had had more yarn but ran out before I could do as many garter stitch rows at the bottom as I would have liked. Next time (and there will be a next time; I loved this pattern and will make it again), I'll make sure I have more yarn, not only to make the last garter stitch block longer, but to make the shawl larger as well. I was stash-busting so I used what I had. I would have liked to have two more skeins for this shawl but it still turned out beautifully and I wear it a lot.

Here is the textured stitch pattern:
  • right side: slip one st as if to purl, K1, YO, pass slipped st over the knitted one and the YO. Repeat to the end
  • wrong side: purl.
The shawl itself is knit from the neckline to the bottom point, so you start with just a few stitches. I also added a two-stitch garter stitch edge to help keep it from rolling. I increased on all right side rows at each edge and on both sides of the center. There are numerous websites with basic instructions on how to do this if you haven't done it before, or contact me and I'll see if I can help. However, rest assured, if I can figure it out, so can you!

Happy knitting!